hra fb twitter
sheffield
header
Rail200

Build Diary entries for May 2024

Here are the diary entries for this month. You can use the forward and backward links to see the next or previous months. Most photos taken before 2018 are small size. From 2018 onwards, most photos you see below will have a link to a full size image by clicking on the photo.

la Previous Month uparrow Return to 2024 Next Month la
Bogie Axlebox Guides (1)
13/05/2024
  Highslide JS
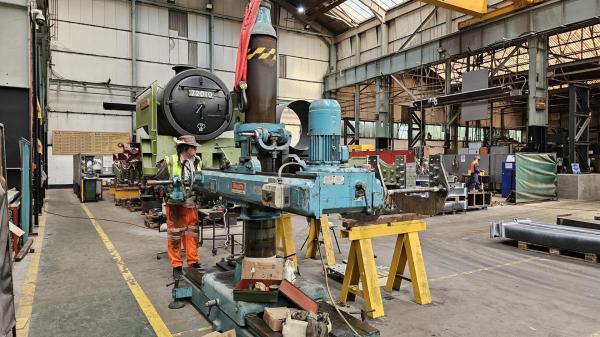
  Mike H at work with the Asquith portable drill in drilling/reaming the bolt holes for the bogie axlebox guides.7 of 8 are now complete - hopefully next week should see this particular job complete.
   
Bogie Axlebox Guides (2)
13/05/2024
  Highslide JS
  With the left hand side complete, we can now fit the liners to the axlebox guides on a temporary basis. The liner is the plate with the "X" lubrication channels - this face is manganese steel which has been welded to the steel liner. The liners are held on with temporary bolts. Next job will be to fit the frame keeps across the top of the frames using bolts in the holes marked D1, D2, D17 and D18. Then we will acculturate measure the gap between the liners in order to calculate how much machining is required to ensure that the faces are truly parallel and have the correct working clearance for the cannon axleboxes.

Note on the Left Leading Trailing axlebox (LLT) guide, one of the bolts is missing. Here the hole when reamed circular turned out to be slightly large so a slightly oversize bolt will need to be ordered to fit. Note that this bolt and the one to the left of it have countersunk heads. This is to avoid fouling problems with the bogie spring cradle.
   
Bogie Axlebox Guides (again!)
28/05/2024
  Highslide JS
  Today we finished off the final bogie axlebox guide bolt holes - drilling and reaming so that heavy drive fitted bolts can be installed. All of the holes have now been fitted and around 75% of the bolts have been driven in. The remaining bolt holes will require oversize bolts; we aim to get a request for quote out this week. In the photo, Geoff checks with a 1.5 thou inch feeler gauge that the axlebox guides are tight up against the bogie frames before Mike starts reaming.
   
Trailing Spring Hanger
28/05/2024
  Highslide JS
  With the axlebox guide hole drilling complete, we could move the Asquith drill to the rear spring hanger bracket. First job was to check that the bracket was in the correct place. The datum is the centre driving axle; from that we measured 7 foot to the rear which is where we want the centre of the trailing coupled axle to be (the coupling rod is 7 foot long). You can see the G cramp securing the plumb line to the left of Mike's hat. Then we confirmed that the noses of the spring hanger brackets were equidistant around the centre line. The trailing spring hanger bracket did need to be moved forward slightly. The purple vertical lines on the bracket and strengthener show the amount of movement. Now we can start to drill the bolt holes - 4 on the outside can be drilled by the Asquith.